
Desserts
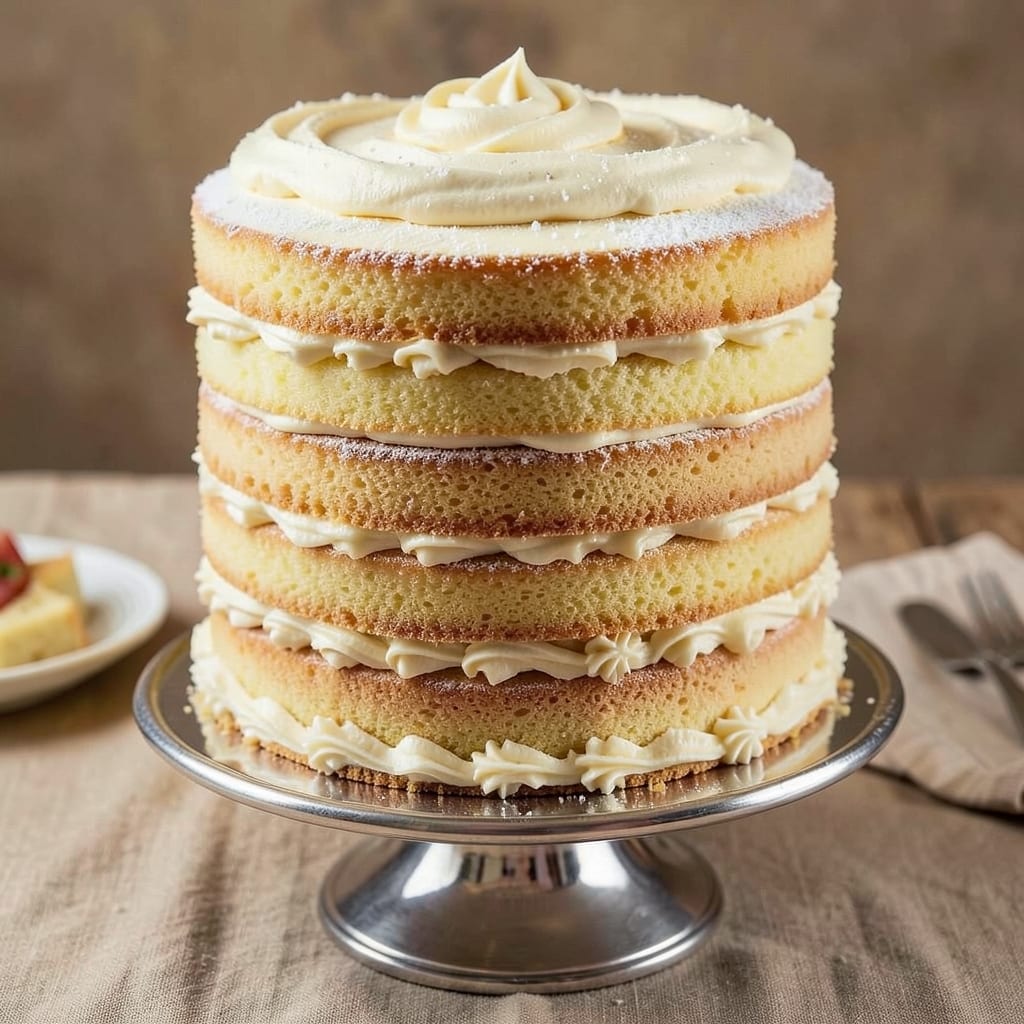
This 18-layer cake recipe delivers the showstopping height and moisture you crave without the stress of professional-level techniques. 💛 The secret lies in thin, evenly baked layers that stay tender for days—no dry crumbs or collapsing towers here. I’ve perfected the balance between structure and softness, so your cake will impress even skeptics who think "18 layers" means "disaster waiting to happen."
What sets this apart is the foolproof layering method: each sheet cake bakes to a precise thickness (just under ¼-inch), then gets filled and stacked while still slightly warm. This ensures the filling stays creamy and the structure holds firm. The vanilla buttercream isn’t just sweet—it’s infused with a touch of vanilla bean and a hint of cornstarch to prevent sogginess, so every slice stays perfect from first to last bite.
By the time you’re done, you’ll have a cake that’s taller than your oven’s capacity but lighter than it looks—each layer moist, each frosting swipe smooth, and every slice worth the effort. The key is patience: baking layers in batches, letting them cool just enough, and assembling with confidence. This isn’t just a cake; it’s a centerpiece that disappears faster than you can say "second helping."
Ready to tackle the project? We’ll break it down into manageable steps—from batter to final decorating—so you can focus on the reward: a cake that’s as impressive as it is delicious. Let’s get started.
Ingredients for 18 layer cake
Thin layers, tender crumb, and creamy buttercream—here’s your 18-layer masterpiece.
| Ingredient | Amount | Notes |
|---|---|---|
| All-Purpose Flour 🌾 | 7 cups | Sifted for even texture |
| Granulated Sugar 🍚 | 3 ½ cups | Divided for batter and filling |
| Unsalted Butter 🧈 | 2 ½ cups | Room temperature, full-fat |
| Large Eggs 🥚 | 12 whole | Room temperature, separated |
| Vanilla Extract 🌿 | 2 tbsp | Pure, high-quality extract |
| Baking Powder 🧂 | 1 ½ tsp | Aluminum-free preferred |
| Salt 🧂 | ½ tsp | Fine sea salt |
| Milk 🥛 | 1 ½ cups | Whole milk preferred |
| Vanilla Bean Paste 🌿 | 1 tbsp | For extra vanilla flavor |
| Cornstarch 🌾 | 1 tbsp | Prevents sogginess |
| Heavy Whipping Cream 🥛 | 3 cups | Cold for buttercream |
| Powdered Sugar 🍚 | 6 cups | Sifted for smooth frosting |
| Unflavored Gelatin 🍬 | 1 tbsp | For layer stability |
| Lemon Zest 🍋 | 1 tsp | Freshly grated |
| Almond Extract 🌿 | ½ tsp | Optional for depth |
The flour and sugar are your foundation—King Arthur or Gold Medal brands make all the difference here. For the butter, Plugrá or Land O’Lakes work perfectly, but never use margarine. Eggs should be large, fresh, and room temperature—crack them gently into a separate bowl to avoid shells slipping in. The vanilla extract? Madagascar bourbon is ideal, but pure vanilla works too. If you’re using a vanilla bean, scrape the seeds directly into the batter for that extra punch. The baking powder needs to be fresh—if it’s over a year old, toss it and buy a new can. Diamond Crystal is my go-to for baking powder, as it’s aluminum-free and lighter.
No vanilla bean paste? Double the vanilla extract—just add it to the dry ingredients instead. Running short on heavy cream? Cool whole milk whipped with powdered sugar works in a pinch, but the texture won’t be as stable. The gelatin is non-negotiable for structure—unflavored, not the fruit kind. If you’re avoiding gelatin, agar-agar can substitute at half the amount, but it has a slightly different set. The lemon zest can be skipped if you’re not a fan, but it brightens the whole cake. For the almond extract, McCormick is reliable, but store-bought is fine—just don’t overdo it. Pre-sift your dry ingredients to avoid lumps, and measure the butter with a kitchen scale for precision—it’s worth the few extra seconds.
Store dry ingredients like flour and sugar in airtight containers in a cool, dark place—mason jars with tight lids work perfectly. Butter can stay at room temperature for up to 2 weeks, but refrigerate it if your kitchen gets warm. Eggs last 3 weeks in the fridge if kept in their original carton. The gelatin and powdered sugar should go in sealed containers—gelatin loses potency when exposed to moisture. Once assembled, your cake will keep at room temperature for 3 days or in the fridge for up to 1 week, but trust me, it’ll disappear before then. For leftovers, slice and freeze individual portions—parchment between layers prevents freezer burn.
Why You'll Love This Recipe
- No Fuss Layers: I swear, this isn’t some Pinterest-perfect cake that’ll have you slaving away for hours. Just mix, bake, repeat—18 thin layers of buttery vanilla perfection with zero stress. The secret’s in the quick-cooking time for each layer, so you’re not stuck waiting.
- Butter So Good: That ratio of sugar to butter? Chef’s kiss. The layers stay tender but sturdy, with just enough vanilla to make every bite feel like a hug. Honestly, I’ve tried fancier cakes, but this one hits the spot without trying too hard.
- Party or Snack: Too fancy for a Tuesday but too simple for a party? This cake does both. Serve it with whipped cream for a birthday dessert or cut into squares for a no-fuss office treat. The thin layers mean easy slicing—no awkward cake smashing here.
- Budget-Friendly Luxury: You’re using pantry staples—flour, sugar, butter—so it’s cheap to make but tastes like you spent all day baking. Plus, the leftovers? They actually improve over time. (Yes, even on a Wednesday.)
Step-by-step instructions for an 18-Layer cake that stays moist for days
Here's how to build a towering, stable cake with layers that stay tender and flavorful.
👨🍳 Step 1: Prepare the Cake Batter for Perfect Texture
In a large mixing bowl, whisk together the 7 cups all-purpose flour, 1.5 tsp baking powder, and 0.5 tsp salt. Sift this dry mixture directly into a stand mixer fitted with the paddle attachment. Add the 2.5 cups unsalted butter, 3.5 cups granulated sugar, and 12 whole large eggs (room temperature). Mix on medium speed for 5-7 minutes until the batter is light, fluffy, and ribbon-like when the paddle is lifted.
This creaming process incorporates air, which creates the tender crumb essential for an 18-layer cake. Stop mixing when the batter reaches 100°F—overmixing develops gluten and makes the cake dense. In a separate bowl, whisk together the 1.5 cups milk, 2 tbsp vanilla extract, 1 tbsp vanilla bean paste, and 1 tbsp cornstarch. Gradually pour this wet mixture into the batter while mixing on low speed until just combined.
🍳 Step 2: Bake Thin, Even Layers for Stability
Preheat your oven to 350°F and line 18 round cake pans (3-inch diameter) with parchment paper. Pour the batter evenly into each pan, filling them ⅓ full. Bake for 8-10 minutes until the edges are set and a toothpick inserted in the center comes out clean. Rotate the pans halfway through baking for even cooking.
Here's the key: these layers must be thin and uniform—about ½-inch thick when baked. Overbaking will dry them out, while underbaking can cause collapse. Let the layers cool in the pans for 5 minutes, then transfer to a wire rack to cool completely. This prevents soggy layers when stacking.
🥘 Step 3: Make the Stabilizing Filling
In a small saucepan, combine 1.5 cups milk, 1 tbsp unflavored gelatin, and 1 tsp lemon zest. Heat over medium-low heat, stirring constantly, until the gelatin dissolves completely. Remove from heat and stir in 0.5 tsp almond extract. Let this mixture cool to room temperature—it should thicken slightly but remain pourable.
In a separate bowl, whisk together 2 cups powdered sugar and 1 tbsp vanilla extract until smooth. Gradually fold this into the cooled gelatin mixture until fully combined. This filling acts as a structural glue between layers, preventing collapse while keeping the cake moist. The gelatin adds stability, while the sugar and vanilla enhance flavor.
🥘 Step 4: Assemble the Cake with Precision
Place the first layer on a cake stand or sturdy plate. Using a small offset spatula, spread 1 tablespoon of the filling evenly over the top. Place the second layer on top, pressing down gently to ensure contact. Repeat this process, alternating layers with filling, until all 18 layers are stacked. The final layer should be placed top-side down to create a flat surface for cutting.
Here's the thing—don't rush the stacking. Each layer should be level, and the filling should be spread evenly to prevent gaps. Use a leveling tool or the back of a knife to check alignment between layers. Once fully assembled, refrigerate the cake for at least 4 hours (or overnight) to allow the gelatin to fully set and the structure to stabilize.
🍳 Step 5: Prepare and Apply the Buttercream
In a stand mixer fitted with the whisk attachment, beat the 3 cups heavy whipping cream on high speed until soft peaks form. Gradually add the 6 cups powdered sugar and continue beating until the buttercream is smooth and holds stiff peaks. Add the 1 tbsp vanilla bean paste and 0.5 tsp almond extract, mixing until fully incorporated.
Once the cake has chilled, remove it from the refrigerator and carefully level the top if needed. Apply a thin crumb coat of buttercream to seal in any crumbs, then refrigerate for 15 minutes. After chilling, apply the final layer of buttercream, smoothing it with a spatula for a professional finish. The buttercream should be thick enough to hold the cake's structure while remaining spreadable.
⏰ Step 6: Chill and Serve for Maximum Moisture
Return the fully frosted cake to the refrigerator for at least 2 hours before serving. This chilling time is critical—it allows the gelatin in the filling to fully set, ensuring the cake maintains its height and moisture. When ready to serve, slice with a hot wire or sharp knife for clean cuts.
Each slice should reveal even layers, with the filling visible between them. The cake will stay moist for 3-4 days when stored properly in an airtight container at room temperature. For longer storage, cover tightly with plastic wrap and refrigerate—bring to room temperature before serving to restore texture.
Pro Tips For Making 18 Layer Cake
- Weigh Your Butter: Cold butter makes a difference in an 18-layer cake—don’t skip it. Cream the butter and sugar at room temperature, but if your kitchen’s warm, chill the butter for 10 minutes first. I learned this the hard way when my first attempt turned out greasy instead of fluffy.
- Bake One Layer at a Time: An oven can’t handle 18 layers at once, and neither can your patience. Bake the cake in batches, letting each layer cool completely on a wire rack before assembling. This keeps the structure stable and prevents soggy bottoms—trust me, you’ll notice if you don’t.
- Use Room-Temp Eggs: Crack those eggs into a separate bowl first, then let them sit for 10 minutes before adding them to the batter. Cold eggs can cause the batter to curdle, and nobody wants lumpy layers in an 18-layer masterpiece. (Yes, even if you’re impatient like me.)
- Level Your Layers: A cake stand isn’t just for looks—it’s for precision. Use a serrated knife or cake leveler to trim each layer evenly before frosting. Uneven layers make stacking messy, and no one wants to deal with that when you’re this close to success.
Perfect pairings for 18 layer cake
Classic Beverage Pairings
Start with a chilled glass of sparkling water with lemon—the effervescence cleanses your palate between bites of rich cake. I reach for San Pellegrino or LaCroix for that crisp, refreshing contrast. For a more indulgent pairing, a small cup of Earl Grey tea (hot or iced) complements the vanilla notes beautifully. The bergamot in the tea enhances the cake’s subtle almond extract flavor without overpowering it. 🍋
Creamy Coffee Complements
If you love coffee, a vanilla latte made with whole milk and a splash of Torani vanilla syrup is perfect. The creamy texture mirrors the buttercream’s richness, while the vanilla ties into the cake’s flavor profile. For espresso lovers, a double shot of cold brew with a dash of cinnamon adds warmth and depth. I always keep a Nespresso machine handy for quick, high-quality coffee pairings.
Wine for Special Occasions
For a celebratory touch, a dry Moscato d’Asti from Italy offers a light, fruity contrast that won’t overpower the cake. Its slight sweetness and bubbles make it a crowd-pleaser. If you prefer red wine, a Pinot Noir with its bright acidity and red fruit notes pairs surprisingly well with the cake’s vanilla and almond flavors. I’ve found Meiomi Pinot Noir to be a reliable, budget-friendly choice for special occasions.
Seasonal Adaptations
In summer, swap the gelatin filling for a light raspberry compote made with fresh raspberries, 1 tbsp cornstarch, and 1 tsp lemon juice. The tartness cuts through the sweetness, and the berries add a vibrant pop of color. For winter, a spiced chai latte with cinnamon and cardamom adds cozy warmth. The spices echo the cake’s vanilla and almond notes, creating a harmonious flavor experience. 🌟
Non-Alcoholic Mocktails
For a festive non-alcoholic option, mix 1 cup pineapple juice, ½ cup coconut cream, and a splash of grenadine for a tropical twist. The pineapple’s acidity balances the cake’s sweetness, while the coconut cream adds a creamy texture. Garnish with a pineapple leaf for an elegant touch. I love serving this at brunch parties—it’s always a hit with both kids and adults. ✨
After-Dinner Digestifs
End the meal with a small glass of amaretto (about 1 oz) for a nutty, almond-forward finish that complements the cake’s flavors. The liqueur’s sweetness and depth echo the vanilla bean paste and almond extract in the cake. If you prefer something lighter, a scoop of vanilla bean ice cream with a drizzle of dark chocolate sauce offers a creamy, indulgent finale. Trust me, this combo is a game-changer for dessert lovers. 💛
Nutrition facts
Frequently asked questions
Can I bake fewer layers if I don’t need 18?
This recipe scales perfectly for any number of layers—just maintain the same ¼-inch thickness for each. For a 6-layer cake, bake 6 pans and halve the filling recipe. The key is keeping the layers thin and the filling proportionate to prevent collapse. The same buttercream ratio works too!
Why does the recipe use gelatin in the filling?
The gelatin creates a structural backbone that prevents the layers from sliding apart while keeping the cake moist. Without it, the filling would be too runny to support 18 layers. The 1 tbsp gelatin per 1.5 cups milk ratio is precise—too much makes the cake stiff, too little causes collapse. For a vegan version, use agar-agar at half the amount.
How do I prevent the cake from collapsing during assembly?
Three critical steps:
- Cool layers completely before stacking,
- Use a leveling tool to ensure perfect alignment, and
- Press layers gently while applying filling. The gelatin filling must be room temperature when spread—too cold and it won’t bond; too warm and it’ll slide. Work quickly but methodically!
Can I make this cake ahead of time?
Yes! Assemble the cake 24 hours in advance and refrigerate uncovered. The buttercream develops a better crust this way. For serving, bring to room temperature for 1-2 hours before decorating. If storing longer than 3 days, wrap tightly in plastic and refrigerate—slice just before serving for the best texture.
What’s the best way to level each layer?
Use a serrated knife or cake leveler tool (like a cake jig) for precision. For the first cut, mark the top with a pencil, then saw gently back and forth. Rotate the pan 90 degrees between cuts to create a perfectly flat surface. The goal is uniform thickness—every layer should be ¼-inch thick when complete.