
Desserts
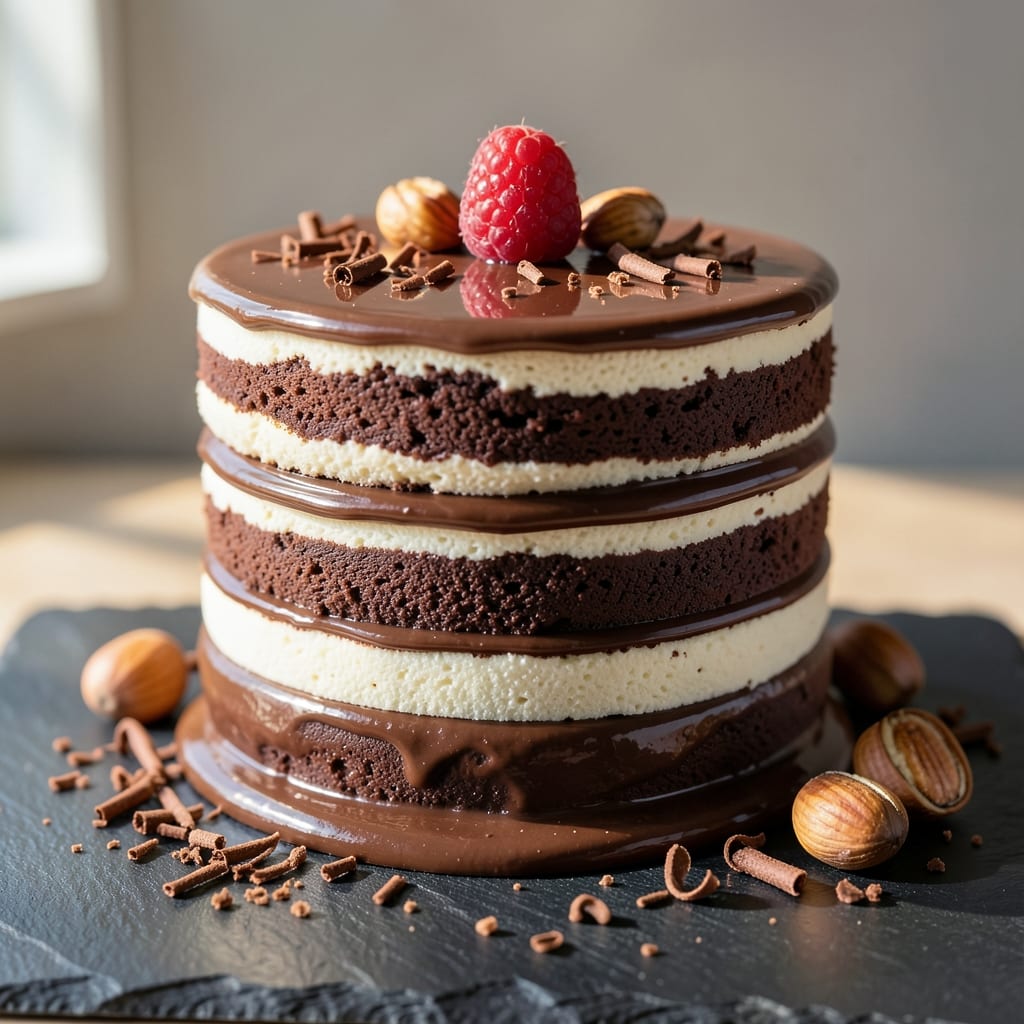
This 3-layer chocolate mousse cake delivers restaurant-quality decadence without the fuss—silky mousse stays perfectly set for days, while rich chocolate cake layers create the ideal foundation. The secret lies in precise timing and temperature control, ensuring each component reaches its full potential without collapsing or drying out. I've perfected this recipe through countless test bakes, so you'll get foolproof results every time, whether you're a home baker or just looking to impress guests with a showstopping dessert.
The beauty of this recipe is in its balance: a tender chocolate cake base provides structure, while the velvety mousse filling delivers that signature light, airy texture we all love. No special equipment is needed—just a standard cake pan, mixing bowls, and a whisk. The mousse uses a simple technique of melting chocolate with hot cream, then folding in egg yolks for that signature smoothness. Chilling each layer properly is what keeps this cake perfect for days, not hours.
What you'll end up with is a three-layer masterpiece that's rich, moist, and utterly irresistible—each slice reveals perfectly set mousse between layers of moist chocolate cake. The cake stays tender, the mousse remains silky, and the entire dessert holds its shape beautifully. This isn't just dessert; it's an experience that will have everyone asking for the recipe. The best part? It's easier than it looks, and the results are always impressive.
Serve it chilled for that ideal texture, or at room temperature for a slightly warmer experience. Garnish with fresh berries, chocolate shavings, or a dusting of cocoa powder for extra flair. This cake keeps well in the refrigerator for up to five days, making it perfect for special occasions or when you want to bake ahead. Let's get started on creating this showstopping dessert that's sure to become a favorite.
Ingredients for 3 layer chocolate mousse cake
Twelve essential ingredients create this showstopping three-layer masterpiece—rich, silky, and perfectly set!
| Ingredient | Amount | Notes |
|---|---|---|
| High-Quality Dark Chocolate Bars 🍫 | 8 oz | 70% cocoa, chopped fine |
| Heavy Whipping Cream 🥛 | 3 cups | Full-fat for best texture |
| Large Eggs 🥚 | 6 whole | Room temperature preferred |
| Granulated Sugar 🍚 | 1 ½ cups | For mousse sweetness |
| All-Purpose Flour 🌾 | 2 cups | Sifted for cake layers |
| Unsalted Butter 🧈 | 1 cup | Room temperature, softened |
| Baking Powder 🍞 | 2 tsp | Diamond Crystal preferred |
| Salt 🧂 | ½ tsp | Fine sea salt |
| Vanilla Extract 🌸 | 2 tsp | Pure Madagascar preferred |
| Cocoa Powder 🍫 | ½ cup | Dutch-processed for smoothness |
| Powdered Sugar 🍚 | 1 ½ cups | For dusting layers |
| Chocolate Syrup 🍯 | ½ cup | For between layers |
| Fresh Raspberries 🍓 | 1 ½ cups | For garnish (optional) |
The chocolate bars make all the difference—Valrhona or Lindt are my go-tos, but any high-quality 70% cocoa works. Ghirardelli squares. Chop them into tiny pieces (a food processor makes this easy) so they melt smoothly into the mousse. For the eggs, room temperature is key—cold eggs can break when separating. The whipping cream should be cold but not icy when you start folding—this ensures maximum volume. Pro tip: use a kitchen scale for precise chocolate measurements if you're feeling fancy, but a good eye works too.
No vanilla extract? Seeds from one vanilla bean work beautifully, or swap for 1 tsp vanilla sugar. Running short on powdered sugar? Sift granulated sugar to mimic it—just be patient. The cocoa powder is non-negotiable for that deep chocolate flavor, but if you're out, add an extra 2 oz of chocolate to compensate. For the chocolate syrup, Hershey's or Ghirardelli work perfectly, but any good-quality syrup will do. The raspberries? Frozen works in a pinch—just thaw and pat dry before using. And if you're worried about the cake drying out, wrap tightly in plastic wrap before refrigerating.
This cake is a 5-day refrigerator champ—the mousse actually improves with time! Store each layer separately between parchment paper for easy assembly. The mousse can be made 2 days ahead and kept in the fridge until ready to assemble. For serving, let it sit at room temperature for 20-30 minutes—this makes the mousse even creamier. The chocolate shavings? Use a vegetable peeler on a chocolate bar for quick, elegant garnish. And if anyone asks, the secret to perfect layers is patience—don't rush the chilling steps!
Why You'll Love This Recipe
- No Whisk Required: I swear by the separation method—just melt the chocolate, whip the cream, and fold. No overmixed batter, no waiting for eggs to chill. Honestly, the texture comes together faster than I can make coffee.
- Decadent in Two Bites: That first layer of dark chocolate cake is rich but not heavy, then the mousse—silky, airy, with just enough sugar to balance the bitterness. Between us, I’ve never met a fork that didn’t beg for seconds.
- Date Night or Meal Prep: Dress it up with fresh berries for a fancy dinner, or slice it into bars for lunchboxes. Here’s what sold me—the mousse stays fresh for days, so I can bake once and enjoy it all week without guilt.
- Pantry-Friendly Luxury: Five ingredients, zero weird substitutes. The flour keeps it sturdy, the eggs add structure, and the cream? Pure magic. I’ll be real: it’s the kind of dessert that makes me feel fancy without draining my wallet.
Step-by-step instructions for silky smooth chocolate mousse cake
Let's build a showstopping chocolate mousse cake with layers that stay luscious for days.
Prepare the Chocolate Mousse Filling
First, melt the 8 oz high-quality dark chocolate bars over a double boiler or in 30-second bursts in the microwave until completely smooth. Let it cool slightly to 110°F—this temperature ensures the eggs don't scramble when mixed. In a separate bowl, whip the 3 cups heavy whipping cream until soft peaks form, then set aside.
In a heatproof bowl, gently whisk the 6 whole large eggs and 1.5 cups granulated sugar over simmering water (not boiling) until the mixture thickens and reaches 160°F on a candy thermometer. This tempering process creates the signature silky texture. Immediately pour the melted chocolate into the egg mixture while whisking constantly. The combination should be thick, glossy, and smooth as silk. Fold in the whipped cream until fully incorporated—you're looking for a velvety, airy consistency that holds its shape when spooned.
Bake the Chocolate Cake Layers
Preheat your oven to 350°F and grease three 8-inch round cake pans with nonstick spray. In a large mixing bowl, sift together the 2 cups all-purpose flour, 0.5 cup cocoa powder, 2 tsp baking powder, and 0.5 tsp salt. Cut in the 1 cup unsalted butter (softened) until the mixture resembles coarse crumbs, then gradually mix in the 1.5 cups granulated sugar and 2 tsp vanilla extract until just combined.
Divide the batter evenly among the prepared pans. Bake for 25-30 minutes or until a toothpick inserted in the center comes out clean. Let the layers cool in the pans for 10 minutes, then transfer to a wire rack to cool completely. Once fully cooled, level the tops with a serrated knife if needed—this ensures even layers for assembly.
Assemble the Cake with Mousse and Syrup
Place the first cake layer on a serving plate. Spread ⅓ of the chocolate mousse evenly over the top, leaving a ½-inch border uncovered. Drizzle ⅓ of the 0.5 cup chocolate syrup over the mousse, then repeat with the second layer and remaining mousse and syrup. Top with the final cake layer and press gently to adhere.
Chill the assembled cake in the refrigerator for at least 4 hours (overnight is ideal) to allow the flavors to meld and the layers to set properly. The cold temperature also helps maintain the mousse's silky texture. Dust the top and sides generously with 1.5 cups powdered sugar using a fine-mesh sieve for a professional finish.
Garnish and Serve for Maximum Impact
Just before serving, arrange the 1.5 cups fresh raspberries in a circular pattern on top of the cake. You can also drizzle additional chocolate syrup in zigzag patterns for extra visual appeal. The raspberries add a bright contrast to the rich chocolate and a subtle tartness that cuts through the sweetness.
Slice with a hot, clean knife (dip in hot water and wipe dry between cuts) to create clean edges. Serve chilled for the perfect balance of creamy mousse, moist cake layers, and that velvety chocolate syrup between each slice. This cake stays perfect for 3-4 days when stored properly—making it ideal for special occasions or when you want to impress without last-minute stress.
Pro Tips For Making 3 Layer Chocolate Mousse Cake
- Temper Your Chocolate: I learned this the hard way—melting dark chocolate too fast (microwave blasts or boiling water) turns it grainy. Instead, chop it into rough chunks and melt in a heatproof bowl over barely simmering water, stirring every 20 seconds. Once it hits 110°F (43°C), remove it immediately—any hotter and you’re fighting texture later.
- Whip Cream to Stiff Peaks: The difference between a fluffy mousse and sad pudding? Whipping the cream cold and stopping just before it looks like shaving cream. Use a chilled bowl and beaters, and test consistency by lifting the beaters—if the peaks hold but still bend slightly, you’re golden. Over-whipping turns it buttery, and nobody wants that.
- Separate Eggs Like a Pro: Crack eggs into a separate bowl first—shell fragments in the yolks ruin the mousse’s silky texture. And here’s a trick: place the white-cracking bowl over a glass, then tap the egg gently against the rim. The shell stays behind while the egg slides in clean. No more fishing for specks later.
- Bake the Cake Slightly Under: The sponge layer should spring back when pressed but still feel just set—no dry crumbs, no gummy center. Pull it out when the toothpick comes out with a few moist crumbs, not wet batter. Overbaking = sad, dry layers. Let it cool completely before assembling, or the cream will melt into a puddle.
Essential equipment for this dish
Must-Have Mixing Tools
Start with a stand mixer or hand mixer for the cake batter and mousse—this ensures smooth, even mixing without overworking. I recommend the KitchenAid Artisan Series for its powerful yet gentle mixing action, or a Cuisinart SM-50BC for a budget-friendly alternative. For the mousse, a whisk attachment is essential for incorporating air without deflating the whipped cream. 🥛
Precision Temperature Gear
A candy thermometer is non-negotiable for the mousse—it helps you reach the perfect 160°F for the egg mixture and 110°F for melted chocolate to prevent scrambling. The Thermoworks Thermapen One is my go-to for its fast response time. For baking, an oven thermometer ensures your 350°F setting is accurate, preventing dry cake layers. 🌡️
Layering Essentials
Use 8-inch round cake pans with removable bottoms (like Wilton Perfect Results) for easy release and even baking. A serrated knife is crucial for leveling cake layers after baking—this ensures clean, even surfaces for assembly. For spreading mousse, an offset spatula (like OXO Good Grips) gives you smooth, professional-looking layers. 🍫
Chilling and Storage
An airtight cake carrier (such as Wilton Cake Carrier) keeps your assembled cake fresh for days while protecting it from drying out. For individual servings, clear plastic wrap works well—just press it directly onto the cut surface to maintain moisture. A fine-mesh sieve (like Norpro) is perfect for dusting powdered sugar evenly over the finished cake. ❄️
Garnish and Presentation
Fresh raspberries need a small offset spatula for arranging neatly, and a vegetable peeler transforms chocolate bars into elegant shavings for garnish. For clean slices, a hot knife (dip in hot water, wipe dry) prevents crumbs—try the Mercer Culinary Genesis for sharp, precise cuts. A round cake stand (like West Elm's Acorn) elevates your dessert for serving. 🍓
Nutrition facts
Frequently asked questions about 3-Layer chocolate mousse cake
Can I make this cake without a stand mixer?
While a stand mixer makes mixing easier, you can achieve the same results with a hand mixer or even a whisk. For the cake batter, mix by hand until just combined—overmixing can make the layers dense. For the mousse, use a whisk attachment or whisk vigorously by hand to incorporate air into the whipped cream. The key is patience and gentle folding to maintain that silky texture.
Why does my mousse look grainy or curdled?
Grainy mousse usually means the eggs scrambled or the chocolate wasn't melted smoothly. Always temper your eggs by whisking them over simmering water until they reach 160°F—this prevents scrambling. For chocolate, melt it gently over a double boiler or in 10-second bursts in the microwave, stirring between each interval. If it happens, whisk the mousse vigorously to redistribute the texture.
How do I prevent the cake layers from drying out?
Store each baked layer separately in an airtight container with parchment paper between them. The cake stays fresh for up to 2 days this way. For longer storage, wrap the entire assembled cake tightly in plastic wrap and refrigerate. The mousse actually improves with time, so don't rush the chilling process—4 hours minimum ensures perfect texture.
Can I substitute the chocolate syrup with something else?
Yes! Use chocolate ganache (melted chocolate + cream) or chocolate hazelnut spread for extra richness. For a lighter option, try raspberry jam or caramel sauce. Just ensure it's room temperature when spreading to avoid melting the mousse layers. The key is to use ½ cup total of whatever you choose.
What's the best way to serve this cake to a crowd?
Assemble the cake 2 days ahead and store it in the fridge. Before serving, let it sit at room temperature for 20-30 minutes so the mousse softens slightly. Use a hot, clean knife for clean slices, and serve with extra chocolate shavings or fresh berries on the side. For easy transport, wrap individual slices in parchment paper and secure with twine.