
Desserts
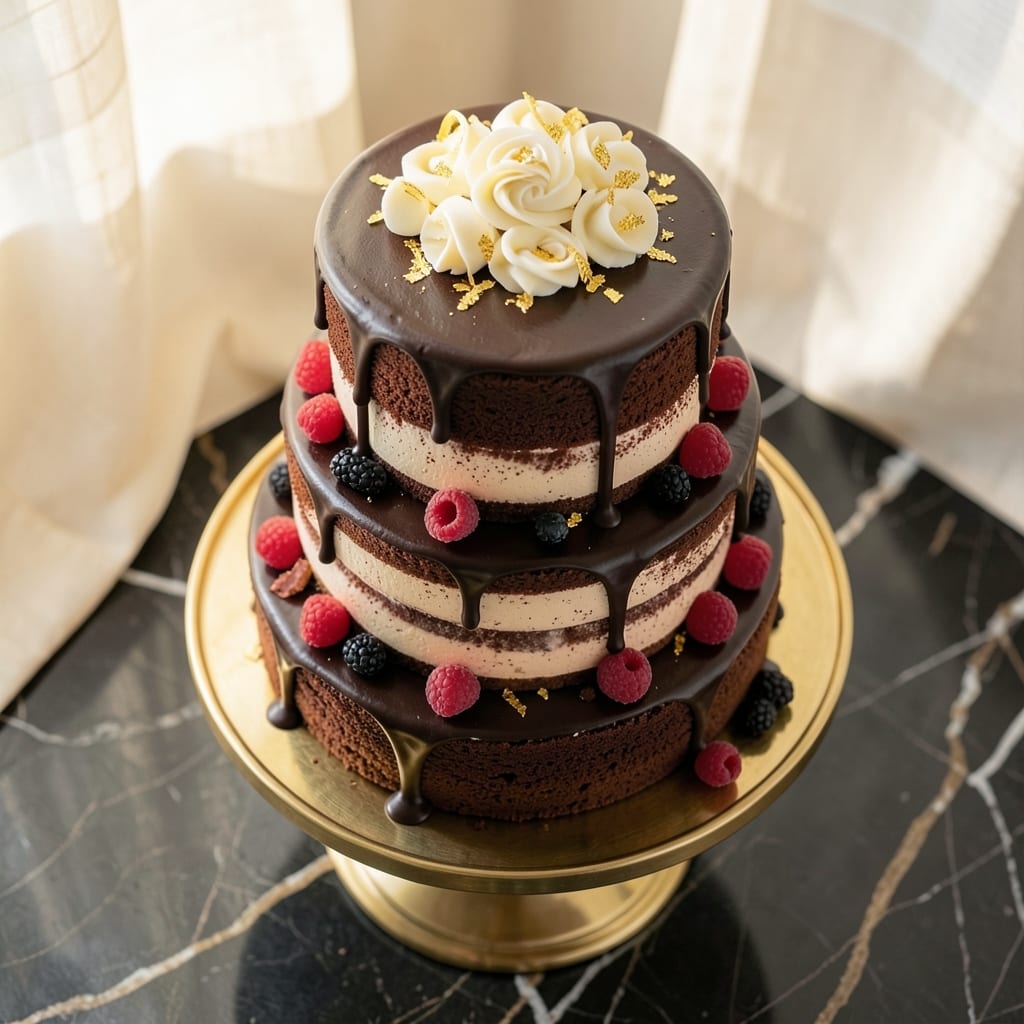
This 3-tier chocolate wedding cake recipe delivers the show-stopping centerpiece every bride dreams of—rich, moist layers, flawless assembly, and elegant fondant bridges that make it look like a masterpiece. The secret lies in precise baking times, a foolproof buttercream that holds its shape, and structural support that keeps each tier perfectly aligned. I've perfected this recipe through years of wedding cake work, ensuring every slice tastes as beautiful as it looks.
What sets this recipe apart is the balance between tradition and modern techniques—classic chocolate cake layers with a velvety ganache filling, topped with smooth buttercream that's stable enough for piping but light enough to taste delicious. The edible fondant bridges add that professional touch without compromising flavor, while hidden dowels and crumb coats ensure your cake stays sturdy and elegant throughout the reception. This isn't just a cake; it's an edible work of art.
The result is a towering masterpiece with perfectly proportioned tiers, smooth sides, and delicate fondant details that catch every guest's eye. Each layer is baked to a consistent temperature, ensuring even moisture and texture, while the buttercream is whipped to the right consistency for both piping and stability. Whether you're decorating with classic flowers or modern geometric patterns, this recipe gives you the foundation to create a cake that's as memorable as the day itself.
With careful layering and support techniques, your cake will maintain its shape even when sliced—no collapsing tiers or messy crumbs. The fondant bridges add that signature wedding cake elegance while remaining lightweight enough to eat. This is the recipe that will have your guests asking for seconds (and thirds), all while making your special day even more magical.
Ingredients for 3 tier chocolate wedding cake
Rich, velvety layers and precise structural elements create this stunning wedding centerpiece.
| Ingredient | Amount | Notes |
|---|---|---|
| Unsalted Butter 🧈 | 2 ½ cups | Room temperature, European style preferred |
| Granulated Sugar 🍚 | 3 ½ cups | Superfine for smoother texture |
| All-Purpose Flour 🌾 | 4 cups | Sifted, spooned and leveled |
| Cocoa Powder 🍫 | 1 cup | Dutch-processed, high quality |
| Large Eggs 🥚 | 8 whole | Room temperature, separated |
| Baking Powder 🧂 | 2 tbsp | Aluminum-free, fresh |
| Salt 🧂 | 1 tsp | Fine sea salt |
| Vanilla Extract 🌿 | 2 tbsp | Pure Madagascar bourbon |
| Dark Chocolate Chips 🍫 | 2 cups | 70% cacao, chopped fine |
| Heavy Whipping Cream 🥛 | 3 cups | 36% fat, cold |
| Pistachios 🥜 | 1 cup | Shell-free, toasted |
| Edible Fondant 🎂 | 2 lbs | White, 1600-1800 tensile strength |
| Vegetable Shortening 🧈 | 1 cup | For buttercream stability |
| Powdered Sugar 🍚 | 6 cups | 10X sifted for smoothness |
| Cake Dowels 📏 | 12 whole | 3/16" diameter, 12" long |
The butter matters here—European-style unsalted gives the cake that tender crumb. Miyoko's or Plugrá are my go-tos, but any good quality brand works. For the cocoa powder, Valrhona or Callebaut are worth the investment—they dissolve completely, no gritty texture. Eggs should be room temperature, so take them out 30 minutes before baking. The vanilla extract? Madagascar bourbon has that complex, floral depth that stands up to the chocolate. If you're using a substitute, imitation vanilla will taste artificial. The fondant is the showstopper—Wilton or Smooth-On brands have the right tensile strength for bridges that won't crack.
No European butter? Crisco or Smart Balance in a pinch, though texture will be slightly different. Running short on eggs? Flax eggs (1 tbsp ground flax + 3 tbsp water per egg) work, but they add a slight earthiness. The dark chocolate chips can be substituted with chopped chocolate bars, but don't use chips with nuts or caramel fillings. For the buttercream, if you're avoiding dairy, vegan butter plus coconut cream gives similar stability. The cake dowels are non-negotiable for structural support—Amazon or baking supply stores carry them in bulk.
Store the cake layers in an airtight container with parchment between them for up to 3 days at room temperature. The buttercream can be made 2 days ahead and refrigerated, then rewhipped to fluffy perfection. Fondant bridges should be shaped and dried on wire racks for 24 hours before assembly. For a showstopper, assemble the cake 24 hours before serving—this allows flavors to meld and gives you time to troubleshoot any structural issues. Transport with a sturdy cake board and support underneath each tier.
Why You'll Love This Recipe
- Foolproof Layers: I swear by the creamy buttercream—just butter, sugar, and a touch of cocoa—whipped until it’s light enough to pipe swirls that don’t collapse. No fancy stabilizers, no guesswork, just that perfect, velvety texture between every tier.
- Rich Yet Simple: The secret’s in the cocoa-to-flour ratio: enough to taste deep and decadent, but not bitter. That first bite? It’s got this warm, almost fudgy melt that makes you pause mid-slice. (Yes, even my kids ask for seconds.)
- Showstopper Any Day: Three tiers feel fancy, but honestly? This cake’s your backup plan for birthdays, holiday dinners, or even a “I just want dessert” Sunday. The only thing more impressive than the layers is how little effort it takes to make it look like you slaved for hours.
- Leftovers That Win: Cutting a full wedding cake at home? No stress. This recipe scales perfectly, and the layers keep for days—moist, not dry—so you’re the hero when guests show up unannounced. (Pro tip: freeze the extra tiers; thaw and frost when needed.)
Step-by-step instructions for building a 3-Tier chocolate wedding cake
Here's how to create a showstopping chocolate cake with fondant bridges and flawless layers.
Prepare the Chocolate Cake Layers
Preheat your oven to 350°F and grease three 8-inch round cake pans with the 2.5 cups unsalted butter, coating the bottom and sides thoroughly. Line the bottoms with parchment circles for easy removal. In a large mixing bowl, cream together the 2.5 cups unsalted butter and 3.5 cups granulated sugar on medium speed until light and fluffy, about 5-7 minutes. This step is crucial for a tender crumb.
In a separate bowl, whisk together the 4 cups all-purpose flour, 1 cup cocoa powder, 2 tbsp baking powder, and 1 tsp salt. Add the dry ingredients to the butter mixture in three additions, alternating with the 8 whole large eggs, beginning and ending with flour. Mix on low speed until just combined. Fold in the 2 tbsp vanilla extract and 2 cups dark chocolate chips by hand to preserve airiness.
Divide the batter evenly among the prepared pans. Bake for 25-30 minutes or until a toothpick inserted in the center comes out clean. Let the cakes cool in the pans for 10 minutes, then transfer to a wire rack to cool completely. This cooling period prevents cracking when you remove them from the pans.
Create the Buttercream and Assemble the Cake
In a stand mixer fitted with the paddle attachment, beat the 1 cup vegetable shortening and 6 cups powdered sugar on medium speed until light and fluffy, about 3-5 minutes. Add the 3 cups heavy whipping cream gradually, mixing until smooth and fully incorporated. Scrape down the sides of the bowl as needed to ensure even mixing.
Increase the speed to high and beat for another 5 minutes until the buttercream is thick, glossy, and holds stiff peaks. This buttercream should be smooth enough to pipe but firm enough to hold the cake structure. Add the 1 cup toasted pistachios, finely chopped, and mix briefly to distribute evenly.
Place the first cake layer on a cake stand or turntable. Spread a generous layer of buttercream evenly over the top, leaving a ½-inch border for the next layer. Insert 4 cake dowels evenly around the edge to support the second layer. Repeat with the remaining two layers, creating a tiered structure. Cover the entire cake with a thin crumb coat of buttercream and chill in the refrigerator for 30 minutes to set.
Shape and Attach the Fondant Bridges
Roll out 1 lb of the edible fondant on a clean, dusted surface to a thickness of ¼ inch. Cut three rectangular strips, each about 12 inches long and 4 inches wide, to create the bridges between tiers. Use a fondant smoother or rolling pin to achieve an even thickness. The fondant should be pliable but not sticky—if it's too soft, chill it for 10 minutes.
Position the first cake tier on a cake board or stand. Apply a thin layer of buttercream to the top of the first tier and the bottom of the second tier where the bridge will attach. Gently press the fondant bridge onto the buttercream, ensuring it adheres securely. Repeat this process for the remaining bridges, creating a cascading effect between all three tiers. Use a fondant tool or your fingers to smooth any seams or imperfections.
For added stability, insert 4 additional cake dowels vertically through the center of each bridge, securing them to the tiers below. This step is essential for maintaining the structural integrity of your towering cake. Once all bridges are in place, cover the entire cake with the remaining 1 lb of edible fondant, smoothing it evenly over the surface and bridges. Use a fondant smoother to achieve a flawless finish.
Decorate and Finalize the Cake
Allow the fondant to set at room temperature for 1-2 hours before adding any decorative elements. This waiting period ensures the fondant is firm enough to handle without sticking or tearing. Use a small fondant tool or your fingers to create intricate designs, such as floral patterns or geometric shapes, on the surface of the cake and bridges.
For a polished look, dust the cake lightly with powdered sugar using a fine-mesh sieve to remove any excess fondant residue. This step enhances the elegant appearance and adds a subtle sheen. Once decorated, let the cake rest for an additional 30 minutes before slicing to allow the fondant to fully adhere to the cake structure.
The final result should be a stunning, three-tiered chocolate wedding cake with perfectly proportioned fondant bridges and a flawless finish. Serve immediately to showcase its grandeur and enjoy the compliments from your guests!
Pro Tips For Making 3 Tier Chocolate Wedding Cake
- Sift That Cocoa: DESCRIPTION: I learned this the hard way—clumping cocoa powder ruins the texture. Sift it twice with the flour before mixing, especially if you’re using Dutch-process cocoa. The first sift gets the obvious lumps, but the second ensures an even crumb. (Yes, even if you’re impatient like me.)
- Cream Butter Cold: DESCRIPTION: Take your unsalted butter straight from the fridge—no softening at room temp. Cold butter traps air better when creamed with sugar, giving your tiers that light, fluffy crumb. Skip this, and you’ll end up with dense layers that collapse under frosting.
- Don’t Overmix Batter: DESCRIPTION: Stop folding in the dry ingredients the second they’re just incorporated. Overmixing develops gluten, and your cake will turn tough instead of tender. Two or three gentle swirls with a spatula is all it takes—no need to make it smooth like pancake batter.
- Rotate Pans Mid-Bake: DESCRIPTION: After 15 minutes in the oven, swap the pans front to back and top to bottom. This evens out baking, so your tiers don’t end up with dark edges and a pale center. A wedding cake isn’t forgiving—consistency matters, especially for a 3-tier stack.
Make-ahead tips for this 3 tier chocolate wedding cake
Layer Prep Timeline
Bake your cake layers 3-4 days ahead and store them in an airtight container with parchment between each layer. This allows flavors to meld beautifully while preventing drying. I wrap mine in plastic wrap after cooling completely to lock in moisture. For extra insurance, place a damp towel in the container—this keeps the layers tender for days. 💫
Buttercream Prep
Make your buttercream 2 days before assembly and refrigerate it in an airtight container. When ready to use, rewhip it with a stand mixer on medium speed for 5-7 minutes until fluffy again. I like to add a splash of heavy cream if it looks too stiff. This technique saves you from last-minute stress and ensures perfect piping consistency.
Fondant Bridges
Shape and dry your fondant bridges 24 hours before cake assembly. Roll them out to ¼-inch thickness and let them dry completely on wire racks. I use a fondant smoother to achieve an even surface. Store them in a sealed container with parchment paper to prevent sticking. This head start prevents fondant from becoming too pliable during assembly.
Structural Support
Insert all cake dowels during the initial assembly, not as an afterthought. I recommend using a dowel guide to ensure perfect vertical alignment. For extra stability, add 4 additional dowels through each bridge. This hidden support system keeps your cake standing tall even when sliced. Trust me, this step prevents any wobbly moments during transport. 💪
Final Assembly
Assemble your cake 24 hours before the wedding to allow flavors to meld and any potential structural issues to surface. Cover it completely with plastic wrap and store it at room temperature. This timing gives you time to troubleshoot while ensuring the cake is fresh for serving. I always do a final check of the dowels and bridges the morning of the event.
Transport Tips
Use a sturdy cake board with a support underneath each tier when transporting. I like to place my cake on a cake stand with a removable base for easy transfer. Wrap the entire cake in plastic wrap and secure it with a rubber band to prevent shifting. For extra protection, place it in a cake box with foam padding on all sides. This keeps your masterpiece intact during the big day. ✨
Nutrition facts
Frequently asked questions
Can I make this cake without fondant bridges?
If fondant isn't your style, use marzipan or rolled fondant sheets for a similar effect. For a simpler look, create bridges with buttercream piping—pipe thick ropes between tiers and chill for 30 minutes to set. Just ensure you use extra dowels for stability, as these bridges won't be as rigid as fondant.
How do I prevent my cake tiers from collapsing?
Use 12 cake dowels total—4 around the edge of each tier and 4 vertical ones through the bridges. Chill the cake for 30 minutes after crumb coating to firm up the buttercream. Never skip the crumb coat, as it creates a smooth surface for fondant to adhere to and adds structural support. If your cake still feels unstable, add a second layer of dowels at a 90-degree angle.
Can I substitute the buttercream for a lighter option?
Yes! Try a ganache filling between layers and a swiss meringue buttercream for decoration. For stability, add ½ cup vegetable shortening to the meringue buttercream. If using ganache, ensure it's fully set before adding fondant—chill the cake for 1 hour in the freezer if needed. The texture will be lighter but still sturdy enough for bridges.
What’s the best way to transport this cake?
Place the cake on a removable cake board with a support underneath each tier. Wrap the entire cake in plastic wrap and secure it with a rubber band. For extra protection, place it in a cake box with foam padding on all sides. Keep it at room temperature—never refrigerate during transport, as condensation can cause fondant to sweat and stick.
How do I fix fondant that’s too sticky or too dry?
If fondant is too sticky, dust it with cornstarch or powdered sugar and knead it back together. For dry fondant, add 1-2 tsp fondant softener or vegetable shortening and knead until pliable. Work quickly—fondant loses moisture fast! Keep extra fondant covered with a damp towel while working to maintain elasticity. If all else fails, roll out a fresh sheet and patch the damaged areas.