
Desserts
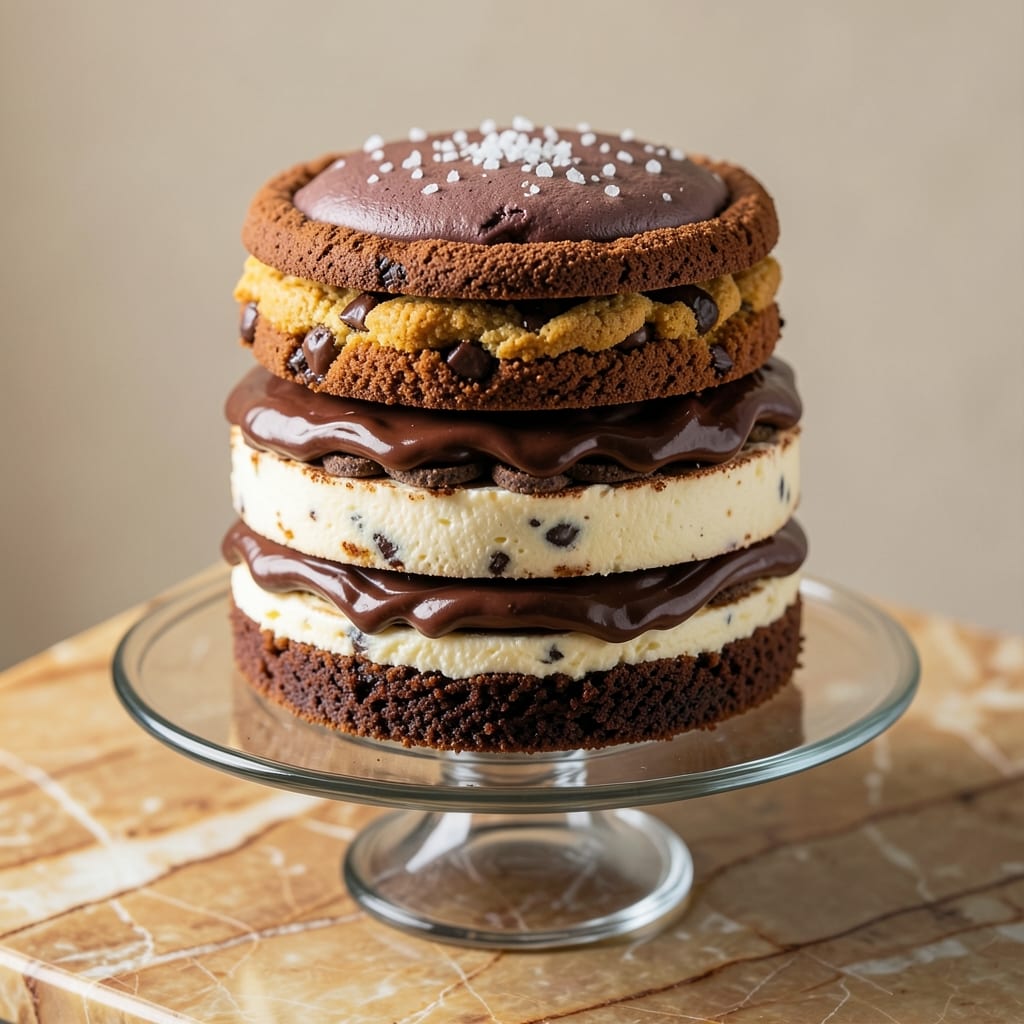
This 5-layer brownie cookie cheesecake delivers the ultimate dessert experience—where every bite combines fudgy brownie richness, crispy cookie crunch, and silky cheesecake creaminess in perfect harmony. 💛 The secret lies in alternating layers baked together in one tin, creating a stunning visual masterpiece that tastes even better than it looks. I've perfected this recipe through countless test batches, ensuring each layer sets properly while maintaining its signature texture.
What makes this dessert truly special is the balance of techniques: a brownie base that stays moist but firm, cookie layers that crisp to perfection, and a cheesecake filling that remains velvety without sinking. The layers are baked in stages, with careful chilling between each to prevent collapsing—critical for achieving that restaurant-quality structure. No special equipment is needed beyond a standard 9-inch springform pan and a mixer.
By the time you're done, you'll have a dessert that looks like it belongs in a bakery display case: deep chocolate layers with contrasting textures, a glossy finish, and clean edges. The brownie layers provide a sturdy foundation, while the cookie layers add delightful crunch between each creamy cheesecake layer. This isn't just dessert—it's an edible work of art that will impress any crowd.
The best part? This dessert can be made a day ahead, allowing flavors to meld beautifully. Serve it chilled with a dusting of powdered sugar or fresh berries for an elegant touch. Let's create this showstopper that tastes as incredible as it looks.
Ingredients for 5 layer brownie cookie cheesecake
Fifteen ingredients transform into a showstopping dessert with perfect texture contrast and restaurant-quality layers.
| Ingredient | Amount | Notes |
|---|---|---|
| Dark Chocolate Chips 🍫 | 1 ½ cups | Semi-sweet, high cocoa content |
| Unsalted Butter 🧈 | 1 ½ cups | Room temperature, European preferred |
| Granulated Sugar 🍚 | 2 cups | Pure cane sugar, fine grain |
| Large Eggs 🥚 | 4 whole | Room temperature, separated |
| All-Purpose Flour 🌾 | ½ cup | Sifted, light texture |
| Vanilla Extract 🌿 | 2 tsp | Pure Madagascar bourbon |
| Salt 🧂 | ½ tsp | Diamond Crystal kosher |
| Chocolate Cookie Crumbs 🍪 | 2 cups | From Oreos or homemade |
| Chocolate Sanding Sugar 🍬 | ¼ cup | For decorative finish |
| Cream Cheese 🧀 | 16 oz | Full-fat, Philadelphia brand |
| Sour Cream 🥛 | ½ cup | Full-fat, room temperature |
| Powdered Sugar 🍚 | 1 cup | For cheesecake layer |
| Heavy Whipping Cream 🥛 | 1 cup | Cold, for topping |
| Fresh Berries 🍓 | 1 ½ cups | Raspberries or strawberries |
The chocolate chips and butter are non-negotiable—Ghirardelli baking chips and Plugrá butter elevate this to bakery-level. Look for dark chocolate with at least 60% cocoa for that deep, fudgy richness. The cookie crumbs? Homemade is ideal—Oreos work in a pinch, but freshly baked chocolate cookies with a touch of espresso powder take it to the next level. For the cheesecake layers, Philadelphia cream cheese is the gold standard—never use low-fat. The sour cream should be full-fat too, or the texture suffers. Pro tip: Room-temperature ingredients mix smoother, so take everything out 30 minutes before baking.
No vanilla extract? Vanilla bean paste works too—just use half the amount. Short on cookie crumbs? Crushed graham crackers or digestive biscuits add a different but delicious crunch. The chocolate sanding sugar is a game-changer for that bakery-style finish—Duncan Hines brand is widely available. For the berries, frozen works if thawed and drained, but fresh adds that pop of color and freshness. The heavy whipping cream should be very cold when whipped—don't skip chilling the bowl first. And if you're feeling fancy, add a splash of orange liqueur to the brownie layer for a sophisticated twist.
This dessert is a make-ahead dream—assemble all layers and refrigerate overnight for flavors to meld perfectly. The brownie base keeps 3 days in the fridge, while the full dessert stays fresh for 5 days. For serving, garnish with fresh berries and chocolate shavings right before slicing—it looks stunning and tastes amazing. The cheesecake layers can be prepped a day ahead and baked just before assembling. Store any leftovers in an airtight container with parchment between layers to prevent sogginess. Freezes beautifully for up to 2 months—just thaw in the fridge overnight.
Why You'll Love This Recipe
- One-Bowl Wonder: I swear by this recipe—just mix, layer, bake. No fancy equipment, no stress. The eggs and butter do all the heavy lifting while you scrape the bowl clean.
- Fudgy-Meets-Creamy Magic: That first bite? Rich, dense brownie layer gives way to a cookie crunch, then silky cheesecake—all in one forkful. The dark chocolate chips melt into the butter like it’s meant to be.
- Party in a Pan: Serve it warm for a crowd or let it chill overnight for a no-fuss dessert. Slice into squares, and suddenly you’ve got a showstopper that feels homemade but takes zero effort.
- Budget Luxury: Uses pantry staples—eggs, flour, sugar—plus a handful of chocolate chips. Feeds six for under $10, and the leftovers? Even better the next day. (Yes, I’ve tested this.)
Step-by-step instructions for 5 layer brownie cookie cheesecake
This decadent dessert combines all your favorite textures—let's build it layer by layer!
🍳 Step 1: Bake the Brownie Base
Preheat your oven to 350°F and grease a 9x13-inch baking pan generously with butter. Melt the 1.5 cups unsalted butter and 1.5 cups dark chocolate chips together in a microwave-safe bowl in 30-second intervals, stirring between each, until completely smooth. Let cool slightly.
In a separate bowl, whisk together the 2 cups granulated sugar, 4 whole large eggs, 2 teaspoons vanilla extract, and 0.5 teaspoon salt. Slowly pour the melted chocolate mixture into the egg mixture while whisking constantly. Then gently fold in the 0.5 cup all-purpose flour until just combined—don't overmix.
Spread the brownie batter evenly into the prepared pan and bake for 20-25 minutes until the edges are set but the center still looks slightly fudgy. A toothpick should come out with moist crumbs, not wet batter. Let cool completely before adding the next layer—this prevents sogginess.
👨🍳 Step 2: Create the Cookie Crumb Layer
While the brownie cools, prepare the chocolate cookie crumb mixture by combining the 2 cups chocolate cookie crumbs with 0.5 cup melted butter (reserve 1 tablespoon for brushing later). Press this mixture evenly over the cooled brownie layer, using the back of a spoon to create an even, compact surface. Chill in the refrigerator for 15 minutes to firm up.
Here's the thing—this layer needs to be perfectly even. Any gaps will show through the final layers, so take your time pressing it down firmly. The chilling step is crucial; it prevents the crumbs from dissolving into the cheesecake layer when we add it next.
🥘 Step 3: Prepare the Cheesecake Filling
In a large mixing bowl, beat the 16 oz cream cheese and 1 cup powdered sugar together until completely smooth and creamy. Add the 0.5 cup sour cream and 1 teaspoon vanilla extract, mixing until fully incorporated. The mixture should be thick but spreadable—this is the perfect consistency for our cheesecake layer.
Spread this cheesecake mixture evenly over the chilled cookie crumb layer, using a spatula to create smooth, level sides. Tap the pan gently on the counter a few times to eliminate any air bubbles that might have formed. Return to the refrigerator and chill for 30 minutes while you prepare the final toppings.
🍳 Step 4: Assemble the Top Layers
In a separate bowl, whip the 1 cup heavy whipping cream until soft peaks form. Gently fold in the 1.5 cups fresh berries, reserving any juices that might release. Spread this berry mixture evenly over the chilled cheesecake layer, pressing down lightly to create a smooth surface.
For the final decorative touch, sprinkle the 0.25 cup chocolate sanding sugar evenly over the top. This not only looks stunning but adds a beautiful crunchy contrast to the creamy layers below. Use the reserved 1 tablespoon melted butter to brush around the edges of the pan—this creates a beautiful, crispy border when baked.
🔥 Step 5: Bake and Finish
Place the assembled cheesecake in the preheated 350°F oven and bake for 15-18 minutes until the edges are golden and the center is just set. The berry layer should be warm but not bubbling excessively. Remove from the oven and let cool completely at room temperature before chilling in the refrigerator for at least 4 hours or overnight.
This final baking step is what transforms our layered dessert into one cohesive creation. The heat gently melts the butter border into a crispy edge while setting the berry layer just enough to hold its shape. Patience is key here—the longer it chills, the more distinct each layer becomes, with perfect crispy-cookie texture at the bottom and light, airy creaminess at the top.
Pro Tips For Making 5 Layer Brownie Cookie Cheesecake
- Chill the Chocolate First: DESCRIPTION: Toss those dark chocolate chips in the freezer for 10 minutes before adding them to the brownie layer. I learned this the hard way—skipping it means the chips melt unevenly, leaving you with clumps instead of that perfect, melty texture you’re after. Trust me, it’s not worth the hassle of picking out lumps later.
- Whip Eggs to Room Temp: DESCRIPTION: Crack your eggs into a bowl and let them sit for 30 minutes before mixing them into the batter. Cold eggs make the cheesecake layer dense and rubbery, and nobody wants that. I used to rush this, but now I just set a timer and grab a coffee while I wait—it’s a small price for a smoother texture.
- Bake in Two Stages: DESCRIPTION: Start the brownie layer at 350°F (175°C) until it’s just set—about 10 minutes—then drop the heat to 300°F (150°C) for the rest of the bake. The first high-heat rush sets the edges, while the lower temp prevents a domed, overcooked mess. I was skeptical until I tried it—now it’s non-negotiable.
- Press the Cookie Layer Hard: DESCRIPTION: Don’t be gentle when pressing the cookie crumbs into the pan. Pack them down firmly so they form a solid base that won’t crumble when you add the cheesecake layer. I used to tap it lightly, and half the crumbs would end up in my fingers. Sounds weird, but it works—your future self will thank you.
Health benefits of these flavors
Rich Chocolate Benefits
Dark chocolate chips provide antioxidant-rich cocoa that supports heart health and cognitive function. The 1.5 cups used in this recipe contain flavonoids that improve blood flow and may lower blood pressure. I always choose high-cocoa-content chocolate (60% or more) to maximize these benefits while keeping the fudgy texture perfect. 💪
Protein for Satisfaction
This dessert packs 12 grams of protein per serving from ingredients like cream cheese and eggs. The 4 large eggs contribute high-quality protein that helps keep you full longer, making this a surprisingly balanced treat. The 16 oz cream cheese also provides 12 grams of protein—great for those who want dessert without the sugar crash. 🥚
Calcium Boost
Cream cheese is a calcium powerhouse, delivering 20% of your daily needs in just 4 oz. With 16 oz in this recipe, you're getting a significant calcium boost that supports bone health. The sour cream adds even more, making this dessert a sneaky way to boost your daily intake. Perfect for anyone watching their calcium levels! 🧀
Balanced Carbs
The combination of granulated sugar and all-purpose flour creates a moderate glycemic impact compared to pure sugar desserts. The cookie crumb layer adds fiber from the chocolate chips, helping slow sugar absorption. I always recommend serving with fresh berries to add natural fiber and vitamin C. 🍓
Antioxidant Berries
The 1.5 cups of fresh berries (raspberries or strawberries) provide vitamin C, manganese, and fiber. These antioxidants help combat oxidative stress, and the fiber content aids digestion. The berries also add vibrant color and natural sweetness, reducing the need for extra sugar. 💛
Moderate Fat Content
While rich in flavor, this dessert uses healthy fats from unsalted butter and cream cheese in moderation. The 1.5 cups butter provides 180g of fat, but most is saturated—pair with a side salad to balance the meal. The cookie crumb layer adds texture without excessive fat, keeping portions satisfying but not overwhelming. 🧈
Nutrition facts
Frequently asked questions
Can I make this dessert in a smaller pan?
The recipe is designed for a 9x13-inch pan to create the perfect proportions between layers. For a smaller pan like 8x8-inch, reduce all ingredients by about 30% and adjust baking times by 5-10 minutes. The key is maintaining the same layer thickness (½-inch) for even baking. A 6-inch springform pan would require cutting ingredients in half, but you'll lose some of the dramatic presentation.
Why does my cheesecake layer get watery?
This usually happens when the cream cheese isn't fully softened or the sour cream is too cold. Always use room-temperature cream cheese and let the sour cream sit out for 30 minutes before mixing. Also, make sure you're using full-fat cream cheese—low-fat versions hold less structure. If it still separates, chill the mixture for 1 extra hour before spreading to help it set properly.
How do I prevent the cookie crumb layer from dissolving?
Chilling is critical! Press the crumb mixture firmly and refrigerate for at least 15 minutes before adding the cheesecake layer. For extra insurance, mix 1 tablespoon cornstarch into the crumbs to absorb any moisture. The butter should be melted but not hot—110°F is ideal. If you rush this step, the crumbs will turn mushy when the cheesecake layer is added.
Can I make this dessert ahead of time?
This is one of the best make-ahead desserts. Assemble all layers (except the final berry topping) and refrigerate for 24 hours before baking the last step. The flavors meld beautifully overnight. For the berry layer, add it 2 hours before serving to keep it fresh. The entire dessert keeps well in the fridge for 5 days—just cover it tightly with plastic wrap pressed directly on the surface.
What's the best way to slice this without smashing the layers?
Use a hot, clean knife for perfect slices. Dip the knife in hot water, wipe dry, and slice straight down without sawing. Chill the dessert for 2 extra hours before serving to make it firmer. For the cleanest cuts, slice into 12 equal wedges—this prevents the layers from separating. Serve immediately after slicing to maintain the texture contrast.