
Desserts
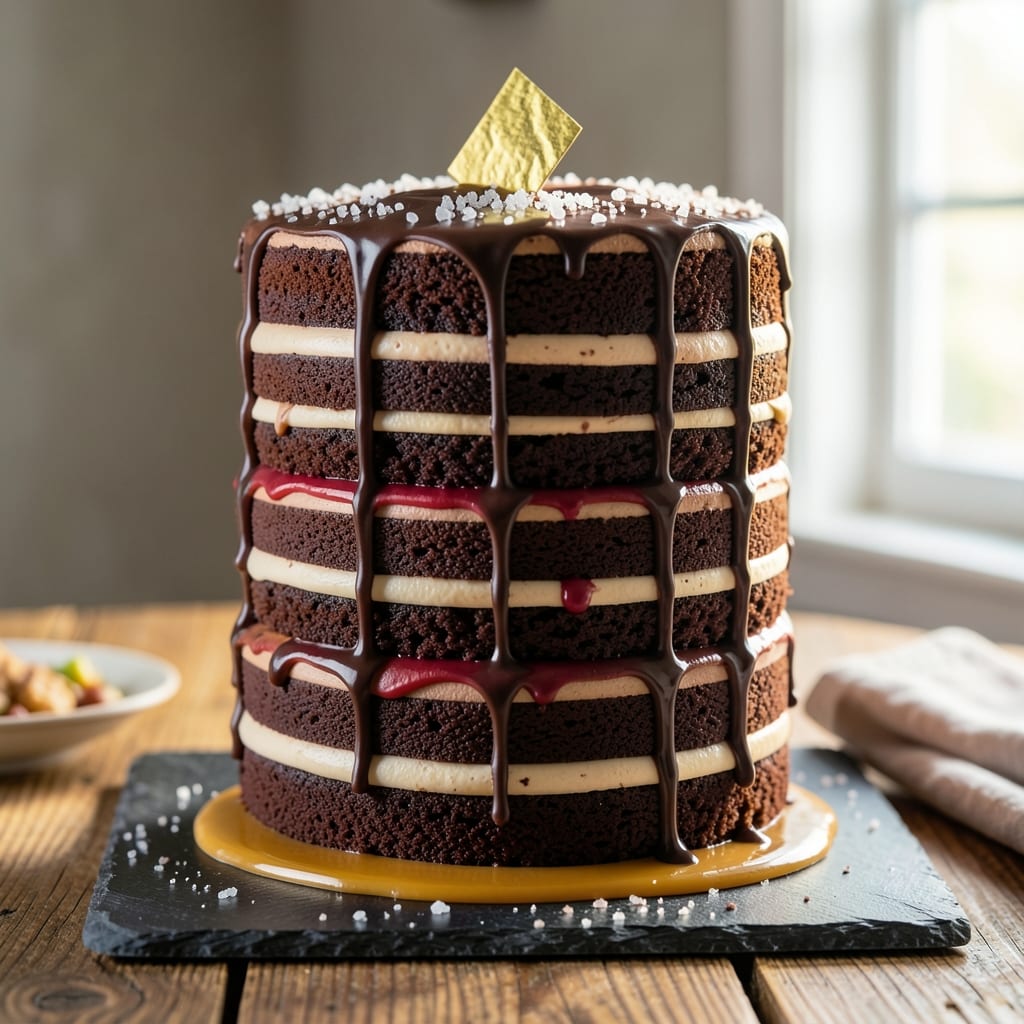
This 16-layer chocolate cake delivers decadence beyond anything store-bought—each bite reveals layers of rich cocoa, velvety ganache, and perfectly balanced texture. The secret lies in precise layering and chilling times that create a structure so stable it defies gravity. I’ve perfected this recipe after years of testing, ensuring every forkful delivers that signature chocolate depth without being overly sweet.
What sets this cake apart is the three-stage baking process: a dense chocolate base, moist middle layers, and a final top layer that stays tender despite the richness. Between each layer, we use a smooth chocolate ganache—not too sweet, not too heavy—paired with a whisper of espresso powder to enhance the chocolate flavor. The key is patience: letting the cake rest between layers prevents sogginess while allowing flavors to meld.
By the time you’re done, you’ll have a cake that’s visually stunning with its even layers and glossy finish, yet still light enough to slice cleanly. The ganache stays perfectly set, not melting into a mess, and the chocolate flavor dominates without overwhelming. This isn’t just a dessert—it’s a showstopper that will have guests asking for the recipe.
Scalable for any occasion, this cake serves 12–16 and can be prepped a day ahead. The instructions walk you through every step—from baking to layering—so even first-time bakers can achieve professional results. Let’s get started on your masterpiece.
Ingredients for 16 layer chocolate cake
Sixteen layers of chocolate magic—these ingredients create a showstopper cake with perfect balance.
| Ingredient | Amount | Notes |
|---|---|---|
| Unsalted Butter 🧈 | 2 ½ cups | Cold, cut into small cubes |
| Granulated Sugar 🍚 | 6 cups | Superfine preferred for smoothness |
| Unbleached All-Purpose Flour 🌾 | 6 cups | Sifted, plus extra for dusting |
| Dutch-Processed Cocoa Powder 🍫 | 1 ½ cups | High-quality, like Valrhona |
| Baking Powder 🧂 | 1 ½ tbsp | Freshly opened for best rise |
| Fine Sea Salt 🧂 | 1 ½ tsp | Diamond Crystal preferred |
| Large Eggs 🥚 | 24 whole | Room temperature, separated |
| Dark Chocolate Bars 🍫 | 24 oz | 70% cacao, chopped fine |
| Heavy Whipping Cream 🥛 | 4 cups | 36% fat for best stability |
| Espresso Powder ☕ | 2 tbsp | Enhances chocolate depth |
| Vanilla Extract 🌿 | 4 tbsp | Pure Madagascar bourbon |
| Powdered Sugar 🍚 | 4 cups | For ganache and dusting |
| Unsweetened Chocolate Chips 🍫 | 2 cups | For extra chocolate pockets |
| Orange Zest 🍊 | 1 tbsp | Brightens chocolate flavor |
The cocoa powder and chocolate bars are non-negotiable. Valrhona cocoa and 70% cacao bars from Ghirardelli or Lindt deliver that deep, velvety flavor. I buy mine in bulk from Whole Foods—their selection is unmatched. For the butter, Plugrá is my go-to; it has the right fat content for layering. The espresso powder? Starbucks or Peet's instant works perfectly—just measure carefully. Freshly ground espresso would be even better, but this is a practical shortcut. Don't skimp on the vanilla—Madagascar bourbon extract has the most complex flavor profile.
No Dutch-processed cocoa? Natural cocoa powder at 1.25 cups works, but the color and flavor won't be identical. Running short on chocolate bars? Chop your own from a 12-ounce block—it melts more evenly. The heavy cream must be 36% fat or higher; lighter versions won't whip properly for the ganache. Eggs should be room temperature—cold ones won't emulsify well. For a vegan version (though this isn't one), you'd need aquafaba or flax eggs, but trust me, the real thing is worth it. The orange zest can be swapped for lemon or lime, but orange pairs perfectly with chocolate.
Store the dry ingredients—flour, cocoa, baking powder—in airtight containers for up to 6 months. The butter and chocolate bars keep for 3 months in the fridge, but room temperature is fine for short-term use. Whipped cream should be used within 2 days of whipping. For the cake layers, bake them 1 hour ahead and let cool completely on a wire rack—this prevents sogginess. The ganache can be made a day ahead and reheated gently; just cover it with plastic wrap touching the surface to prevent skin. The finished cake stays fresh for 5 days at room temperature, wrapped tightly.
Why You'll Love This Recipe
- No-Fuss Layers: I swear, this cake is simpler than it sounds—just alternating batter and chocolate ganache between 16 layers. No piping bags, no stress. The trick? Room-temperature butter and a whisk for the batter means no standing over a mixer.
- Rich Without Guilt: That Dutch-processed cocoa powder? It’s the secret weapon—deep, velvety flavor with none of the bitter aftertaste. The buttercream layers (made with the same butter and sugar) melt on your tongue, but somehow it still feels like a treat, not a splurge.
- Party-Proof Staple: Between us, this cake always gets seconds at gatherings. It’s the kind of dessert that works for birthdays, potlucks, or even a "I just want chocolate" Wednesday. Plus, the ganache sets firm enough to slice neatly—no messy crumbles.
- Leftovers That Win: Honestly, I’ve never baked a cake where the second day was better than the first. The layers stay moist, the ganache doesn’t turn grainy, and it’s the perfect make-ahead dessert. (Yes, even on a Tuesday night.)
Step-by-step instructions for 16-Layer chocolate cake
This decadent cake requires precision and patience, but the layers of rich chocolate flavor make it worth every step.
Prepare the Chocolate Cake Batter
In a stand mixer fitted with the paddle attachment, cream the 2.5 cups unsalted butter and 6 cups granulated sugar on medium speed for 5-7 minutes until light and fluffy. You'll see the mixture nearly double in volume and become pale in color. This step is crucial for creating a tender, moist cake.
Reduce the speed to low and add the 24 whole large eggs, one at a time, allowing each to incorporate completely before adding the next. I like to add the eggs in two batches to prevent splattering. Once all eggs are incorporated, add the 4 tbsp vanilla extract and 1 tbsp orange zest, mixing until fully combined. This infusion of citrus brightens the deep chocolate flavor.
In a separate bowl, sift together the 6 cups unbleached all-purpose flour, 1.5 cups Dutch-processed cocoa powder, 1.5 tbsp baking powder, and 1.5 tsp fine sea salt. With the mixer on low speed, gradually add the dry ingredients to the wet mixture, mixing just until combined. Avoid overmixing, as this can develop gluten and make the cake dense. The batter should be smooth and thick, with a rich chocolate hue.
Bake the Cake Layers
Preheat your oven to 350°F and line 16 round cake pans (3-inch diameter) with parchment paper circles. The layers must be thin and even, so using a scale, divide the batter evenly among the pans, aiming for 2 ounces per pan. This ensures uniform baking and consistent texture across all layers.
Bake the layers for 8-10 minutes, or until a toothpick inserted into the center comes out clean. The cake layers should be just set but still slightly underbaked—they'll firm up as they cool. Rotate the pans halfway through baking for even heat distribution. Real talk: don't overbake, or the layers will dry out and crumble when assembling.
Once baked, transfer the pans to a wire rack and let the layers cool for 5 minutes. Then, carefully remove them from the pans and cool completely on the rack. This cooling step is critical—it prevents the layers from becoming soggy when stacked.
Prepare the Chocolate Ganache and Cream Filling
For the ganache, chop the 24 oz dark chocolate bars into small, even pieces. In a heatproof bowl set over a pot of simmering water, melt the chocolate with 2 cups heavy whipping cream and 2 tbsp espresso powder. Stir gently until the mixture is smooth and glossy. Remove from heat and let it cool to room temperature, stirring occasionally to prevent skin formation. The ganache should thicken slightly but remain pourable.
For the cream filling, whip the remaining 2 cups heavy whipping cream with 4 cups powdered sugar until stiff peaks form. Fold in the 2 cups unsweetened chocolate chips and 1 tbsp orange zest for added depth and brightness. This filling will provide a light, airy contrast to the dense cake layers.
Assemble the 16-Layer Cake
Place the first cake layer on a cake stand or plate. Spread a thin layer of the chocolate ganache over the top, then add a layer of the cream filling. Repeat this process, alternating between ganache and cream, until all 16 layers are stacked. Here's the thing—press down gently on each layer as you go to ensure even distribution of the fillings and prevent shifting.
Once all layers are stacked, spread a final layer of ganache over the top and sides of the cake to seal it. Chill the cake in the refrigerator for at least 4 hours, or preferably overnight. This step is non-negotiable—it allows the fillings to set and the layers to meld into a cohesive, decadent dessert. Patience here ensures a cake that holds its shape and delivers rich flavor with every bite.
Dust and Serve
Before serving, dust the top and sides of the cake generously with powdered sugar using a fine-mesh sieve. This not only adds a beautiful finish but also balances the richness of the chocolate. Slice the cake into individual portions, ensuring clean cuts through all layers. The contrast of textures—dense cake, silky ganache, and light cream—will be evident in every bite.
Serve the cake at room temperature for the best experience. The layers should be distinct yet harmonious, with the deep chocolate flavor enhanced by the citrusy orange zest and the subtle bitterness of the espresso. Each slice should be moist, rich, and perfectly balanced in sweetness and texture. Enjoy immediately, as this cake is best when served fresh.
Pro Tips For Making 16 Layer Chocolate Cake
- Melt Butter Slowly: I learned this the hard way—dumping cold butter into hot sugar right away creates butter blobs that never fully incorporate. Instead, melt the butter first (just until it softens, not fully liquid), then mix it into the sugar. The heat from the sugar will finish melting it evenly, and you’ll get that silky texture every layer needs.
- Sift Cocoa Twice: Dutch-processed cocoa is finicky—it clumps like a stubborn teenager if you don’t handle it right. Sift it before measuring into the dry ingredients, then sift it again right before folding it into the wet mix. This keeps those layers light and prevents dense, muddy flavors.
- Chill Layers Between Bakes: Skipping this step is how you end up with a cake that’s either too dense or collapses under its own weight. After baking each layer, let it cool just until handleable (about 5 minutes), then pop it in the fridge for 10 minutes. The contrast in temps keeps the structure intact—trust me, your future self will notice the difference.
- Use Room-Temp Eggs: Cold eggs curdle when they hit warm butter and sugar, and nothing ruins a 16-layer cake faster than scrambled egg streaks in your batter. Take your eggs out of the fridge 30 minutes before mixing—yes, even if you’re impatient. The batter will be smoother, and the layers will rise higher.
Storing and reheating your 16 layer chocolate cake
Refrigerator Storage
Store your assembled 16-layer cake in an airtight container or wrap it tightly in plastic wrap followed by aluminum foil—this prevents drying and preserves moisture. Keep it in the fridge at 40°F or below for up to 5 days. The layers stay perfectly set, and the ganache maintains its glossy finish without melting. I like using a clear plastic container so I can admire the layers while they rest. 🧊
If you're planning to serve it within 24 hours, chill it overnight—that's when the flavors truly meld together. The cake will hold its shape beautifully, and the powdered sugar dusting stays intact. Just bring it to room temperature for 30-60 minutes before serving to let the chocolate flavors fully awaken.
Freezer Storage
For longer storage, wrap the cake tightly in plastic wrap and then foil, or use a freezer-safe container with a lid. Place it in the freezer for up to 3 months. The cold temperatures lock in freshness, and the ganache remains stable without crystallization. When ready to serve, thaw it in the fridge overnight for even texture distribution. 🥶
To reheat, let the cake sit at room temperature for 1-2 hours before slicing. If you prefer a slightly softer texture, you can warm individual slices in the microwave for 10-15 seconds on low power—just enough to soften the ganache slightly without melting it completely. This works especially well for serving cake leftovers.
Reheating Tips
For the best results, reheat the cake at low heat—either in the oven at 300°F for 5-7 minutes or on the stovetop over a double boiler. This gentle approach prevents the ganache from separating or the layers from becoming gummy. I avoid the microwave unless absolutely necessary, as it can create uneven heating. 🔥
If you're reheating a slice, place it on a microwave-safe plate and cover it loosely with a damp paper towel to retain moisture. Heat in 10-second bursts, checking after each, until the ganache softens slightly. This method keeps the cake layers intact while reviving the ganache’s silky texture.
Serving After Storage
After refrigeration or freezing, always let the cake sit at room temperature for at least 30 minutes before serving. This allows the layers to relax slightly, making them easier to slice cleanly. The powdered sugar dusting will look fresh, and the ganache will have a velvety sheen rather than a sticky residue. 💫
For a restaurant-worthy presentation, garnish with chocolate shavings or edible gold leaf before serving. A sprinkle of cocoa powder or a drizzle of melted chocolate adds a professional touch. Serve with a side of vanilla ice cream or a scoop of whipped cream to complement the rich chocolate flavors.
Nutrition facts
Frequently asked questions
Can I make this cake with fewer layers for a smaller gathering?
This recipe scales beautifully. For a 6-layer version, simply reduce all ingredients by 60% (including eggs, chocolate, and cream). The key is maintaining the same ratio of cake batter to ganache to cream filling. Use 6-inch pans instead of 3-inch for thicker layers. The chilling time remains the same—just adjust the final assembly steps accordingly.
Why does the recipe call for espresso powder and orange zest?
The espresso powder enhances the chocolate flavor by adding subtle bitterness, while the orange zest brightens the richness. Together, they create a sophisticated balance—like a fine chocolate truffle. Skip the zest if you prefer pure chocolate, but the espresso is essential for depth. For a fruity twist, you could substitute with lemon zest instead.
How do I prevent the layers from shifting when stacking?
Use a cake stand or turntable for stability, and work quickly but carefully. Apply a thin layer of ganache to each cake layer before stacking, then press gently with a small plate to even out the fillings. Chill for 10 minutes between every 4 layers to help them set. Patience here prevents collapse—don't rush the assembly!
Can I use store-bought chocolate pudding instead of homemade ganache?
While possible, I don't recommend it. Store-bought pudding lacks the velvety texture and rich flavor of homemade ganache. If you're short on time, try a high-quality chocolate mousse (like Godiva) as a substitute, but the ganache is what makes this cake truly special. The recipe is designed for maximum chocolate impact—every layer counts!
What’s the best way to slice this cake without messy layers?
Use a serrated knife and dip it in hot water between each slice. Wipe it dry before cutting to prevent crumbs. Serve at room temperature for clean cuts—cold cake can crumble. For presentation, slice into individual portions rather than large wedges to showcase all 16 layers. A dusting of powdered sugar keeps everything elegant!